| Europa Rear Axle |
By Kiyoshi Hamai
Chapman Report – September 1979
Much of this discussion will be reiterating what is already stated in the shop manual. But, I will be pointing out and highlighting some very important aspects of the Europa Rear Axle assembly. It has been known for wheel bearings to fail within 10Kmiles and U-joints to collapse within 7Kmiles. Therefore the maintenance of the rear axles are always the topic of discussion at any gathering of Europa owners. Some will say the rear wheel bearing are under engineered. Some will say the U-joints were never designed to withstand side loads as they must in a Europa as part of the upper lateral link. I don’t disagree with these arguments but, I feel that with proper maintenance Europa rear axle assemblies are capable of going many thousands of reliable miles. The lack of proper maintenance is certain death – shortened bearing spacers, worn hub carriers, broken or worn stub axles and premature bearing failure. It requires little thought to realize that the cost of bearings, U-joints and spacers are small compared to replacing hub carriers and stub axles.
DISASSEMBLY
The teardown of the rear axle is covered quite well within the text of
the shop manual. Of special interest is the use of a puller versus the
liberal use of the ‘large hammer’ technique. The hammer method
can become very costly with unbelievable speed. One miscalculated blow and
you may need to replace a hub carrier or a stub axle. USE A PULLER!
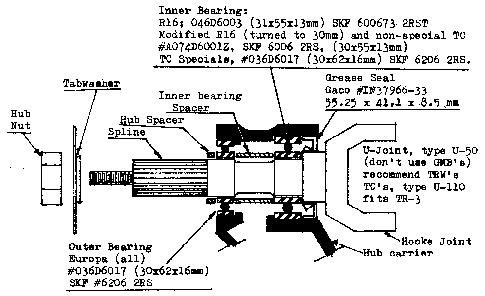
The bearings should remain in the hub carrier, but most commonly the inner bearing comes out with the stub axle. In that case remove the bearing from the stub axle with a puller. (Note: This maybe an indication that the inner bearing is spinning free or is fitting loosely in the hub carrier. See comment later in article.) The outer bearing for certain, will stay in the hub carrier. Clean the assembly by wiping off the grease. Prepare a bucket of boiling water and submerge the hub carrier and bearings in the hot water. This should loosen the bearing sufficiently so that with a suitable drift against the outer ring of the bearing one can knock out the bearing. Make certain that during this operation that the inner bearing spacer is out of the way.
INSPECTION
Thoroughly clean the stub axle and hub carrier. Inspect the stub axle
for wear. If worn, usually at the splines and/or the bearing locations,
REPLACE THE STUB AXLE! Also check for wear in the yoke of the U-joints,
again replacement is the rule. Inspect the hub carrier for wear around the
bearing seats, check for roundness and fit. (If you bearing was removed
from the carrier fairly easily, this is a clue that the hub carrier is
worn.) If wear, looseness, or out of roundness is found, usually caused
from the outer bearing race spinning, either replace the hub carrier or
have a machine shop build up the areas worn and then mill to
specification.
It is very important that the length of the inner bearing spacer should be 2.125" +/-0.010, Lotus #X046D0148Z. All Europa Specials, the length should be 2.00" +/- 0.005, Lotus #A074D0215Z. If the length is not to specification replacement is necessary. (An alternative is to have the spacer built up and ground to size, making certain that the ends are square. Again, a good machine shop can easily handle this.) The length of the spacer is very critical and if ignored will lead to certain premature bearing failure as side loads are being placed upon the new bearings (failure in as little as 2000 miles). Also check the hub spacer for wear. Again, replace if worn. A note, the spacers are inexpensive, so replacement is usually the easiest way.
S2 bearings are of unequal size. Often a groove will be worn into the ends of the inner spacer, whereas the hub spacer will be mushroomed from the hub beating upon it. Effectively this shortens the hub spacer and eventually the brake drum will rub against the back plate.
ASSEMBLY
Assembly is rather simple, the reverse of the teardown. There are some
important aspects of assembly which should not be overlooked.
MODIFICATIONS
Modifications are limited by the design, therefore most maintenance is
restricted to the replacement of worn parts. For owners of Renault Europas
there is one money saving modification. Simply have the 31mm section of
the stub axle turned to 30mm. This is the section which carries the inner
bearing. The benefit is that the inner bearing will no longer be a special
size and impossible to find. Instead with a inner diameter of 30mm it is a
standard size available at most bearing houses.
Another modification was mentioned earlier – the use of a castle nut. This requires cross drilling your stub axle. Finally, the spacers from Lotus are of mild steel. It is possible to have spacers made from harden steel material which is less prone to wear and will retain its size.
U-JOINTS
The U-joints are subject to considerable wear due to the amount of
stress place upon them. Again maintenance is restricted to replacement.
Fortunately, the U-joints are a common size. For Renault Europas it is the
same as Triumph Spitfire, type U-50. For TC Europas it is the same as
Triumph TR3, type U-110. I recommend the use of Hardy-Spicer or TRW, avoid
GMBs. GMBs are not sealed properly and allow water to penetrate into the
cups and rust, leading to failure.
MAINTENANCE
Maintenance is simple…
FINAL NOTE
Now that your rear is in fairly good shape, you can flog the beasty at
the next GGLC run. Food for thought: There are a few other possibilities
for changes which have yet to be tested to my knowledge. Alternative –
drill out the hub carrier and replace the bearing seats with a steel
sleeve with suitable bearing seats for the use of tapered roller bearings.
The inner bearing spacer can be used to pre-load the bearings and can be
adjusted by use of shims. I am sure there are other possibilities, any and
all of which I would be interested in hearing about. But, in the meantime
we can make the most of what is there – which works! The key is
proper maintenance and servicing of the rear hubs and U-joints. So keep
the faith!